Xtensions Best Paypal Pro Buy Now
How to Download?
To download the extension you need to log in to your opencart account or xtensions account.
You need to download the extension for your opencart version, each download displays compatible opencart version in download list.
Installation Instructions for OpenCart 2.x
Warning
These installation instructions assume that you have either fresh or customized installation of OpenCart.
Step 1
Unzip the downloaded ZIP file into a new folder.
Step 2
Login to your OpenCart admin panel and go to Extensions > Extension Installer. Upload the file Xtensions_Paypal_Pro_x.x.x.x_Version_x.x.ocmod.zip, which is in the folder you created in Step 1.
- Go to System > Settings > Edit > FTP and update your FTP settings. After you are done, try uploading Xtensions_Paypal_Pro_x.x.x.x_Version_x.x.ocmod.zip again. If it does not work and you receive the same error "Could not connect as...", follow the next step.
- Go to this link:
https://www.opencart.com/index.php?route=marketplace/extension/info&extension_id=18892 and download and install the Quickfix for the OpenCart Extension Installer. After you are done, try uploading Xtensions_Paypal_Pro_x.x.x.x_Version_x.x.ocmod.zip again.
Step 3
Go to Extensions > Modifications and click the blue Refresh button on the top right.
Step 4
Go to Extensions > Modules > Xtensions Paypal Pro and click the Install button.
Step 5
Xtensions Paypal Pro is now installed. You can access it from Extensions > Modules > Xtensions Paypal Pro.
Step 6
If you are using the Xtensions Paypal Pro module on a live server, make sure to insert your license key in the Extensions > Modules > Xtensions Paypal Pro > Support.
NoteIf you are using the module on a test server, feel free to use it without a license. The license is needed to grant you access to Premium Xtensions support and downloads for future updates of Xtensions Paypal Pro.
Upgrade Instructions
Follow the installation instructions above.
When you are done, go to the module and click Save.
Manual Installation
-
Unzip the downloaded ZIP file into a new folder
-
Navigate to this folder and find the file xtensions_paypal_pro.ocmod.zip. Extract this file.
-
Navigate to the extracted folder. You will notice an upload/ folder.
-
[Optional] Some OpenCart stores have their admin folder renamed and some extra languages installed. If necessary, rename the admin/ folder and the admin/language/english/ folder to match your OpenCart setup.
-
Upload the contents of this folder to your OpenCart store, making sure to preserve the directory structure.
-
The extracted xtensions_paypal_pro.ocmod.zip also contains an install.xml file. Rename the file to install.ocmod.xml.
-
Login to your OpenCart admin panel. Once you do that, go to Extensions > Extension Installer. Upload the file install.ocmod.xml and wait for the success message.
-
Go to Extensions > Modules and find Xtensions Paypal Pro and click the Install button (+ sign).
-
Go to Extensions > Modifications and click the "Refresh" button on the top right.
- Congratulations! Xtensions Paypal Pro is now installed and configured. You can access it from Extensions > Modules > Xtensions Paypal Pro.
Setting
The user interface of Xtensions Paypal Pro is accessible in Admin > Extensions > Modules > Xtensions Paypal Pro > Edit.
This is where you can edit and customize your Xtensions Paypal Pro module. There are 6 tabs with options and information:
This is the main tab of the module. We will now go one by one through each option.
The first option Xtensions Paypal Pro status is for enabling and disabling the module.
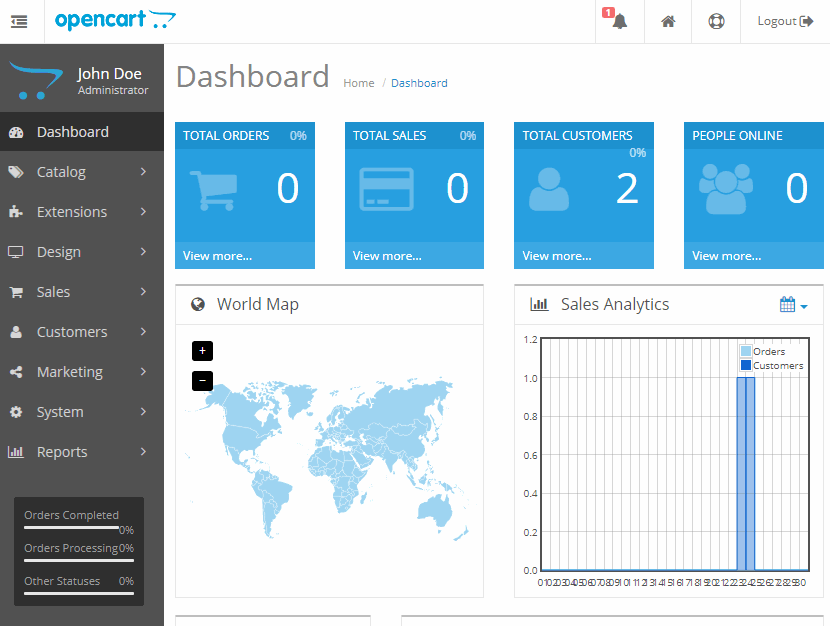
Admin Panel Setting in OpenCart 2.x
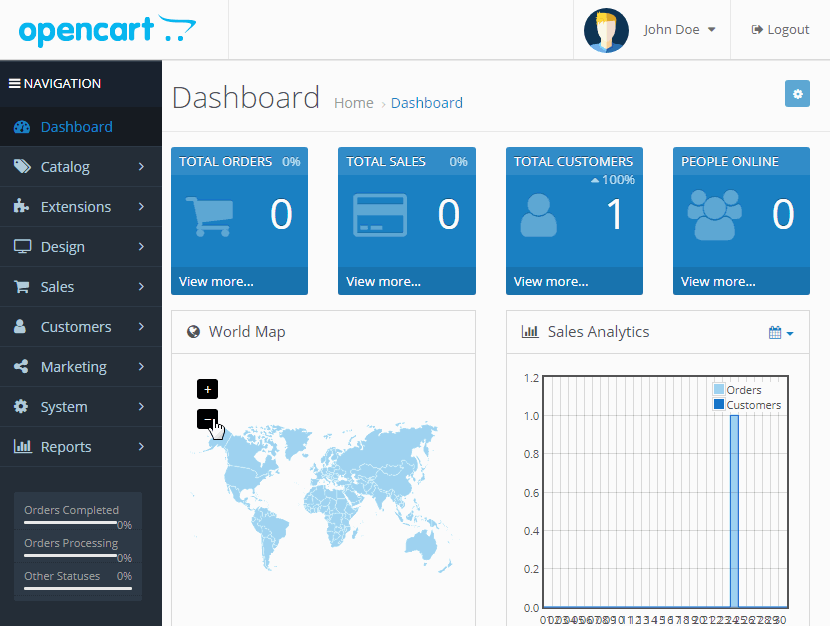
Admin Panel Setting in OpenCart 3.x
Demo Panel
Compatible with best chekout